Wednesday

Charlene & Snippets


C2 I Love Lucy
Early last year I was fortunate to teach Raconteur at the South Coast biannual retreat. For this retreat I chose seven blocks from various collections and combined them into one collection, called Snippets. This was so that I could cover the different techniques in the one class and so cover what I felt might be some of the pitfalls people might encounter. 

C3 Burning Bright
Surprisingly, to me at least, after spending several years making Raconteur I had forgotten how long it actually took me to make those first few blocks. 
C4 Blackberry Freedom
These days I generally make a block in a couple of hours but when I first started it took me the better part of a day and for some blocks even longer. 
 I thought that the students would be able to finish a hand pieced block on the first day, perhaps two if they were experienced and two machine pieced on the second.... oops. 
C6 Crystal Dreams
Most of the students were similar to what I had been at the beginning and so finished one block the first day....because they were good students and went home and worked on it that night. 
C6 Enter With Care

I could definitely do with a few of those conscientious bones some days. Everyone found the second day a lot easier and finished at least one block. One student was even onto her third by the time we had to pack up. I found it a great bunch of students and learn a lot about teaching something so complicated... students will amaze. 
Charlene was in that class and has sent me photos of her finished blocks. She had not made miniatures before and hasn't she made some amazing blocks.
C2 The Rice Pickers
C5 Baby Blue

Tuesday

Tutorial - Foundation Piecing

Well next month there are three of my favourite foundation pieced blocks and so I thought a tutorial wouldn't hurt..... well that was until I tried to make one and discovered that it wasn't as easy to explain as it was to do. So I have done some surfing and hope this helps you. 
I have drawn the foundation papers for the first two videos below if you wish to try them first. 


Gourmet Quilter's Tree
Download them here. I have drawn them in two sizes. The larger size is easier.

When beginning to foundation piece cut your fabric with 1/2in seam allowance on all sides. Even when you are experienced 1/2in is useful if you are covering triangular or strange shaped areas.

Try this video by the Gourmet Quilter first as the shapes are easier as are the sizes.

This is a great video but watch it after the first video.

Connecting Threads
This tutorial is very well presented by Karen Johnson, of Connecting Threads. She teaches you the most common version of Foundation Piecing - usually known as Paper Piecing. Achieve perfect points on tiny blocks with just a few easy tips. Karen recommends the 'add a Quarter Tool' however for the miniature blocks the 'add an eighth ruler is better. Add a quarter is too big for our blocks.

One thing that I would advise you to do those is to NOT trim all of your seam allowances ahead of time. If the fabric slips before you sew it on then you may not have enough seam allowance to fully cover the section where it is needed.

Karen recommends you 
1. you drop your stitch length. She doesn't say how much to drop it but I usually recomend you only drop it by two notches. If you make the stitch length too small it makes it difficult if you make a mistake and need to unpick.
2. change your needle to a heavier or larger size, say size 10. This is to make the perforations larger and so it will make removing the paper later.
3. if you make a mistake and need to unpick a seam use Scotch Magic Tape to cover the mistaken perforated line
4. pressing or at least finger pressing each seam before adding the next seam.

Another video you may like to check out is from  Fons & Porter

Saturday

Scatterday C


There is no character from Sesame Street who can compare to the Cookie Monster and this week he gives us the categories
X. Sunday
X.  wet
X. round
X. colourful
All of which are to be published
7th December

Monday

Quiltmaker 100 blocks winner

Well have just completed the draw. Hopefully people have won something during the blog hop. Mind you although there were approximately 100 prizes there would have been a few hundred participants. But if you didn't win I am sure you found some interesting blogs in your travels as I did.
The winner from my blog is Dawn Frisch who I have contacted and hopefully will hear back from her shortly.
Thank you to everyone who joined in. It was interesting to see that there wasn't an overall favourite block from the collections which goes to show variety is the way to go.

Saturday

Scrumbles & Collection 9

Collection 9

Never let it be said that Carol is one dimensional. Not only does she sew but she also knits and crochets as evidenced by the photos here.

On the left we have Collection 9. I think that is here fourth or fifth collection finished so far. Aren't the colours dramatic?


To the right is one of the scrumbles which she made.
I love the whole idea of scrumbles & attempted to teach Mum how to make these when her dementia was impacting on her crafts. Mum's work in earlier years was exquisite & though her eyesight was failing it had not deteriorated so she couldn't see the change in her work. 
She saw the scrumbles as something I would do, but not as something a 'good' craftsperson would do. Oh how wrong. Wouldn't you love one of these? 
Scrumble by Carol

Friday

New wash away EPP papers

Well while cruising through yesterday's Quiltmaker's 100 Blocks featured designers I came across what looks like an amazing product...   Hugs ‘n Kisses Appliqué paper which is a 50% soluble natural paper with glue on one side. You can print on it using a bubble jet printer, iron the paper onto your fabric, baste as per normal and whip stitch and then wash away. Helen has the papers precut in certain sizes but also explains about using the paper for printing your own templates.

Check out the post here for a good tutorial, with plenty of photos on how to use it and check out here if you want to buy any.  
Looks like a great product which I will have to try..... will let you know how I go with it... wonder if it is good enough to convert me from regular piecing to an EPP fanatic:)

Wednesday

Quiltmaker's 100 Blocks Volume 8

Well Quiltmaker's latest volume in their popular series 100 blocks is now on available at your local newsagent. If you have been collecting these magazines you won't be disappointed with the latest issue. As before there are appliqué, piecing, foundation piecing and mixed techniques and all of these are new original blocks.
Patrice's Gift
My block, Patrice's Gift uses a mixture of foundation piecing and regular piecing... and it is an easy block ..but takes a little more fabric than one might assume:) 
Read my blog post below to find out how you can win your own copy of this great magazine thanks to the generosity of Quiltmaker.
For more chances to win copies make sure to visit the other designers who are featured in this week's blog hop. They are all listed here.
Quiltmaker also is giving out fantastic prizes every day to both local (American) and international (that's us) visitors. So don't forget to leave a comment here ... and there is always a special major prize on the final day.


Tuesday

100 Blocks Inspiration & Competition


Well I have been very fortunate to have another of my blocks chosen for the latest Quiltmaker 100 blocks and through Quiltmaker's generosity you have the chance to win your own copy of the magazine. Details at the end of this post.


Lately many of my ideas have been a follow on from the Raconteur quilt and this block is no exception. Although all of the Raconteur blocks are hexagonal it doesn't take too many errors to change it to a square block and Patrise's gift is no different.


As for the name... well I had pulled out fabric from my stash and took it with me on a weekend's retreat. I thought I had more than enough fabric but found that I didn't have enough of the red to do the last triangle. No matter that it was a small triangle I didn't have it. I put a call out to one of my online quilting groups and Patrise sent it to me.

Initially I planned for the block to simply stretch out from the centre in four directions but wasn't too excited by the block that resulted.

Next I tried simply spinning the triangles around and still thought it could be improved.
I had been looking at some perspective drawing and then tried to encompass that idea into my design... Patrise's Gift was the result.

As you may guess red was not my first plan for the colour. 
Once I worked out my block design the next bit was to find a design that would work with it it.

The central medallion was easy as I thought it was perfect way to showcase the blocks and they were active enough to carry the middle
That left two considerations -  the corners and the area surrounding the medallion.

The first two pictures showed the two possible ways to slope the blocks and although I initially thought all going the same way was boring, the alternative was too disjointed.
I still however thought that the corners were too heavy and so to lighten it I took the outer strips from the block and simply made the centre block and framed it in plain fabric.
This was definitely the best choice.
Initially I had placed four of the triangle centres around the medallion to fill in the space as I am a piecer and not an appliquer. However when I added borders etc there was too much action and no where for the eyes to relax or focus so I removed them.

The plain areas would be perfect for detailed quilting - I'm only just beginning on my machine quilting experience:)


So why have I cut off the corners? So that the quilt can be turned around in all directions on the bed and so equalise or minimise fading due to the sun. Also it means that the corners don't hang lower that the rest of the quilt when on the bed.

Each month another free BOM is uploaded and also a new collection is on sale from the Raconteur Collection here.
For a chance to win your own copy of volume 8 of Quiltmaker's 100 Blocks simply leave your name and the colour of the block you like best from this collection which will be January's featured collection.
A name will be drawn next Saturday. Make sure that there is some way that I can contact you. I'm sorry but anonymous comments are just that anonymous and there is no way of tracking you down.
Good luck.

Quiltmaker's 100 Blocks Bog Hop

My blog addy has changed for this event. 

Please click on this link or go to 

http://raconteurwithcinzia.blogspot.com.au on or after Wednesday 13th. See you there

Carol's Collections

Collection 5 Variation
Carol has started to combine her blocks to form a couple of collections. In this blue collection Carol used five of the original blocks from Collection 5 plus two of her own original blocks.
I have enlarged one of her original blocks which fascinates me. It appears to be one of those Japanese folding blocks. I have written to Carol asking how to make these and will include instructions once I receive them....


I hope you can see this block clearly, it is the largest that I could make it. carol has used a bright yellow/orange in the centre which just peeps out.
I have one of those clover puff quilting tools.. yes another whim I had to have which has only been taken out of the packet once. Read the instructions and thought hmmm.
A task for this afternoon.

May be worth trying for my next baby's quilt :) I am now up to my third attempt and boy is sizing proving a problem.... first attempt turned out to be single bed size while second one will be queen size. It's a good thing I don't actually have a baby in need of a cot quilt :)


collection 6 Variation


The second collection are blocks taken mainly from collection 6. Don't the colour changes make the collection look totally different. The Roses in the central block are gorgeous. Carol uses a lot of fussy cutting to highlight features in her blocks. I love the appearance of fussy cut blocks but have never done a lot of it.... less patience than others:)

Monday

Quiltmaker Blog Tour Begins

Well the Quiltmaker's 100 Blocks Blog Tour begins today. Make sure you stop in at the QuiltyPleasures blog each day for a link to all of the day's blogs plus a host of prizes that you may win.
My day is Wednesday so looking forward to seeing you back here then.

Saturday

How long and quilting - background info

When I made Raconteur I simply made blocks as I felt like it, sometimes I didn't feel like it for quite a while which is why it took me about six years to make. Every block was named for either an event that happened while I was making the block, a significant event in my childhood or sometimes for something that the fabrics suggested. Many blocks were easy to name while others no name settled well for some time. In the end my husband named a few when I couldn't find the right name.

I don't know how fast many of you are with making  your blocks but just as a comparison it took me an average of four hours per block or 30 hours per collection to piece the separate blocks and join them together to make a collection. This time also included the drawing of the design and the cutting of fabric. I would go through stages where I felt like piecing and others where I just felt like cutting. There was one month where I simply designed and cut. Admittedly it was a stressful time at work and so not a lot was achieved that month but I think I managed to cut between five and ten each week. That gave me a wonderful supply of blocks ready for piecing when I went on holidays.

Quilting was then about ten hours per collection as I ditch stitched around each separate dark piece and occasionally add some extra quilting for highlighting. I had initially wanted to hand quilt the whole quilt but due to the thickness and the smallness of all of the pieces I found this wasn't feasible. I am not a fantastic machine quilter and wanted to make the entire quilt myself and so decided the only way that I could manage this would be to complete the quilting as QAYG.

So how long did it take...well approximately 59x40 is just under 2400 hours. If I did this as a full time job doing 35 hours a week it would take me almost 70 weeks, oh about a year and a half. Admittedly I am positive I would have hated the quilt if it was the ONLY thing I did for that length of time:)

So looking at the time it took me how are you going?


Scatterday G

Brought to you by the categories

 % Body
% Hobby
% Lunch
% Green

posting date 23rd November.

Collection 10 - Where Did That Name Come From?


Collection 10
Collection 10 contains mainly early blocks ... and how can I tell this? Well simply by the colours of the fabrics used. 

Raconteur was to be a pastel quilt. After about 100 blocks I discovered that I wasn't a pastel girl and if I didn't extend my palette then I would never finish.

Funny to think that it took me so long to work out pastels weren't my thing ... I'd had to scrounge many of the fabrics for my early blocks from my friend Margaret :)
C10 Twenty One
Fiesta was obviously named because of the colour and pattern in the fabric, very similar to what one would expect to see when ribbons are twirling in the air at the parades of a South American party. 
I just had a thought I hope fiesta means party as I never bothered to look it up just thought it did.
C10 Fiesta

As I said in my BOM post Twenty-One was named because that was the name that popped into my head at the time.... surprisingly it is also the number of pieces of feature fabric that was used... I only discovered this when writing the previous post.
C10 Rainbow Writing

What do children in kindergarden spend an unbelievable amount of time doing? Rainbow Writing, writing words over the top of themselves using as many different colours as possible. Looks pretty ..takes time.


C10  Sweet September

I don't think there is actually an airport called US International but travelling through the USA it never ceased to amaze me how busy and full their airports always were. Few places of peace, or places to relax between flights.

C10 US International

September is spring and that is when the lavendar blossoms. I love when the lilac blosoms tumble to the ground... Sweet September
C10 Salmon Run

Salmon Run, the young fish are washed into the sea andspread afar. Yet years later return to waters they never knew. Some make it back others are not so fortunate.

Who didn't grow up watching The Mouscateers? I still remember the Xmas I received my own mouse ears hat. Never see them these days. 
Yes Mickey was My Hero.
C10 My Hero

Friday

100 Blocks Blog Tour

Do you have a few  minutes to spare during the week of 11th to 15th November? If yes then I would like to invite you to join in Quiltmaker's 100 Blocks blog tour. Each day you will have, not only the chance to win a copy of the latest magazine in the series, but  also possibly one of many great prizes from a fantastic range of sponsors. Simply check out Quiltmaker's blog to find both the list of daily blogs that you can visit and the daily competition for the major prizes.
My block and blog will be featured on Wednesday 13th so make sure to stop in here and check out my block.... it developed from Raconteur... as I'm sure you all expected.  See you in a fortnight.

Win Another Collection

Ok it is time to get photographing. Between now and Xmas you will have the opportunity to win another collection simply by sending in a photo of any blocks and/or collections that you have made. Each photo gives you one entry and these will all be uploaded here to show others what wonderful work you are doing.
I can't wait to see what you have all made.

Thursday

BOM 10 - Twenty-One

Collection 10
Yikes! I just realised that tonight is the night I need to upload my next BOM and I haven't done it yet. I had planned to get ahead with this as I am due to go into hospital tomorrow for an arthroscope to clean up a bit of torn cartilage in my knee. I had been having a lot of pain with it for ages but the doc couldn't find out what it was. At the same time it was collapsing now and then but I didn't think the two things were related.

Paul says I am very much like a guy as far as medical things are concerned... don't worry and hope the problem will go away. He says it's like a tornado hit the room when I go into the doc's with the speed I try to get out of the place :)

Anyway the Xray showed nothing and an ultrasound also showed nothing. Darling Paul suggested that perhaps I should mention the collapsing of the knee and viola off to see orthopaedic surgeon... MRI later and problem found. Tornado in and out tomorrow...thankfully only day surgery.

But back onto this month's BOM. This block is called Twenty-One, which you may think was named because there are 21 pieces of feature fabric. Sorry that's not the case. It was named Twenty-One because that was what popped into my head at the time. Until just now I had never counted how many pieces were in the block. This block will be tricky due to the large number of pieces but take it slowly and carefully and I am sure you will find it turns out beautifully.

Wednesday

Collection Winner

I know this is late but I really haven't been on the ball lately. Paul did a draw  on 15th October, as promised, and the winner of another collection is Georgina Karo who has selected Collection 60 for her prize. Yes there is a collection 60 but I haven't finished writing it up and Georgina wanted a surprise. When I finish writing it up I will post it and a photo here.
Congratulations to Georgina and good luck to everyone when we have our net draw.. most likely for Xmas, but I am still to work out the details.

Tuesday

How to Make Freezer Paper Templates

I have received a couple of emails since my previous post asking about the use of template plastic and benefits of that over freezer paper for drawing the templates.
I wish I had kept those templates just so I could show you how small and insane they were. 
I had never heard of using freezer paper for templates when I began this quilt and it was only after talking with Margaret McCaughey that I learnt of it.  It made my task so much easier ... and for you it is easier still if you print your templates onto the freezer paper, rather than draw them.
Yes you can reuse the template plastic templates...if you can find them and so many are almost identical that it is hard to tell them apart. It was only after I had done about 100 blocks that I could usually tell the difference between two very similar templates. 
The next disadvantage was trying to cut the plastic accurately with such small pieces.
Freezer paper is so much easier as you are able to iron it to the fabric and then trace around the pieces without the fear that either one will slip.
If you have never tried printing on freezer paper it is a top technique if you follow a few simple steps.
  1. Cut the freezer paper just a smidgin smaller than an A4 sheet of paper.
  2. Iron the freezer paper to a blank piece of paper just along the top and the bottom edges.
  3. You need to find out if your printer prints on the top side of paper in the tray or on the lower side. Write top/upper side on one side of a piece of paper and lower side on the other side. Place this sheet of paper into your printer tray with the 'top/upper side' facing upwards. Print something on the paper.
    you now know which side your printer prints on. 
  4. Place the freezer paper+blank paper into your printer laying the correct way so that it will be printed on.
  5. Print as normal.
  6. Give it a go.. it will be a lot quicker than drawing.
One thing to take care of however is that you don't transfer ink from the freezer paper to your iron or fabric. Always place a piece of scrap fabric between the printed freezer paper and your iron.

Sunday

Starting your Journey - Organisation

Well I realise I really should have posted this information several months ago but honestly I never thought of it.

When I first started I did the blocks one by one. Designed it, traced the templates onto template plastic, cut fabric and then sewed it. Then did the same for the second block etc. 

After a few weeks, I found that it was best to get ahead with cutting. From then I went with what I felt like doing. 

Most weekends I cut the fabric, when I was stressed I designed, (designing is really just drawing lines and colouring in) and when I wanted to relax I sewed. It worked well.

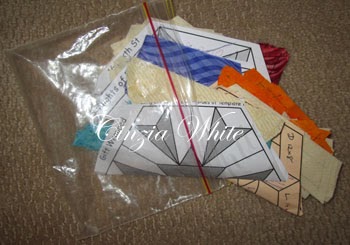
The smallest zip lock bags were perfect for storing the cut fabrics. I would place several blocks into the same bag along with the picture of the design. Once I thought I didn't need to include the design as I was feeling too lazy to draw it out again. Remember when I started this project I drew EVERYTHING by hand. I drew the original design on some graph paper, then onto template plastic (yes I did start with template plastic)...... anyway as you may guess it was next to impossible to work out which design belonged to which fabric. Thankfully I only had a few blocks in that bag and knew they had come from one of two design sheets.


Saturday

Scatterday K

And to brighten up your next few days how about we find items beginning with the letter K, but to make it more fun they need to be in the categories
# in your neighbourhood
# edible
# container
# and from the sewing room something king size
Posting date is 9th November.